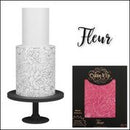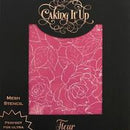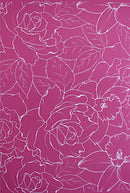


Caking It Up has done it again with her world trending Mesh Stencils. Intricate detail and super fine designs are made possible with the mesh system which holds inner pieces of the stencil together allowing much finer patterns than ordinary stencils.
The Fleur stencil measures 23 x 26cm with the inner design measuring 21 x 25cm. They are the perfect size for double-barrel cakes and tall tiers, but also efficiently divine on cookie and cupcake toppers too.
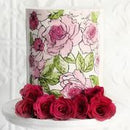
Use with royal icing or piping gel over fondant, buttercream over buttercream. Paint in extra colour detail after stenciling with edible art paints. Use to create texture by applying same colour onto same colour (ie white on white) or choose a striking contrast colour.
Wash in warm soapy water and dry before each use. A fan or cool oven can be used to speed up the drying process.
Watch the 'How to' video here
STENCILING ON FONDANT
Some equipment that you will need to stencil on a fondant cake include:
- Masking tape or pins (only for fondant cakes)
- Offset spatula or silicone spatula
- Royal icing
- White gel colour or liquid whitener (optional)
- Large Scraper (optional)
Some helpful tips and information for stencilling:
- Fondant cakes are easier to stencil if the fondant has been allowed to set hard.
- Royal icing is the best medium for fondant cakes as it dries in little time, allowing for quick application of consecutive panels.
- The consistency of the royal icing can be anywhere between a honey like viscosity to a smooth peanut butter viscosity and will also depend on how it has been coloured.
- It is strongly advised to test your icing and stencil on a rolled-out piece of fondant to check it is the best consistency to showcase all the fine lines and to not bleed through.
- Pre-mix royal icing is great to use as you can play around with the consistency easily by either adding more powder or more water until you have reached the desired consistency.
- Be sure to allow each panel to dry thoroughly before securing your stencil to complete the next panel.
- If you are using a colour other than black to stencil, it is recommended that you tint your royal icing with a white colouring first. This will create a nice solid base colour. Royal icing is naturally transparent so adding white will make it opaque and result in a more vibrant result.
- If you do not wish to have the border space on your tier, simply raise your cake onto something smaller in circumference.
- If you do make a mistake and wish to remove the stencil design, you can use some vodka or cake decorating alcohol such as rose spirit on a clean cloth and wipe it away. It is advised you allow the moisture on the fondant to dry before reapplying.
- If you remove your stencil and realise part of the design is missing simply wait until the stencilled part is fully dry, line up your stencil and apply a small amount of your royal icing over the part that needs correcting.
- If you only want to stencil a partial area of the stencil design you can use the masking tape to mask off the areas you don’t want to stencil.
- If you are stencilling onto a coloured cake with the same colour icing it is a good idea to tint your icing a few shades darker so you can see the stained design.
- Wash your stencil with warm soapy water, pat dry and leave to fully dry before using again. A great way of speeding up this process is to use the fan on your over…but please make sure the heat is off!
BUTTERCREAM CAKES
Some equipment that you will need to stencil on a buttercream cake include:
- Offset spatula or flexible silicone spatula
- Buttercream
- Scraper (optional)
- A crusting buttercream like ermine or American buttercream work well with these stencils. Swiss meringue buttercream is not a great buttercream to use as it doesn’t set hard enough, however you can still use coloured dusts over the top of the design for the details to come through.
- Royal icing is another option to use when stencilling on buttercream cakes. It is a great medium as it dries almost instantly making panelling less stressful.
- Buttercream cakes will need to be either refrigerated or put into the freezer for about 20 min or until it is well chilled and firm to touch.
- Your stencil should be fine to secure itself to a chilled cake meaning no need to hold it in place.
- Use a spatula to spread the buttercream across your stencil and apply enough pressure to push the buttercream through the mesh to ensure it stains the design effectively.
- If you are stencilling onto a coloured cake with the same colour icing it is a good idea to tint your icing a few shades darker so you can see the stained design.
- To avoid the stencil moving during application of buttercream, start in the centre of the design and spread the buttercream outward to all sides.
- If you only want to stencil a partial area of the stencil design, you can use the masking tape to mask off the areas you don’t want to stencil.
- If you do not wish to have the border space on your tier, simply raise your cake onto something smaller in circumference.
- Be sure to allow each panel to dry thoroughly before securing your stencil to complete the next panel.
- Wash your stencil with warm soapy water, pat dry and leave to fully dry before using again. A great way of speeding up this process is to use the fan on your over…but please make sure the heat is off!
Payment & Security
Your payment information is processed securely. We do not store credit card details nor have access to your credit card information.
